easypay module requirements
-
Make sure you are running PrestaShop version 1.7.8.6 or later (this guide uses screenshots from PrestaShop 8.1.4).
-
Verify that all the basic requirements for PrestaShop and its modules are met. You can check them here: https://devdocs.prestashop.com/1.7/basics/installation/system-requirements/
Installation
-
Download the file “prestashop_easypay_v1.2.9.zip” and access your PrestaShop back office.
-
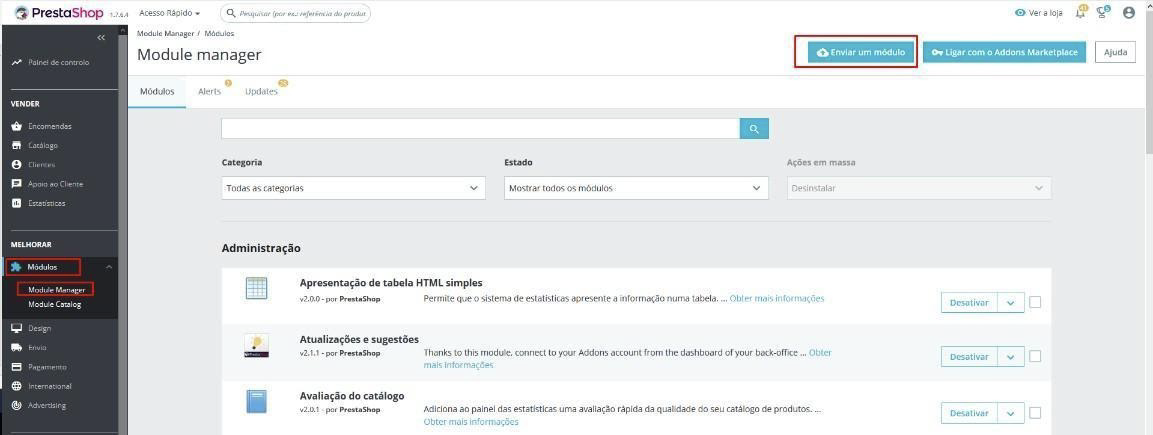
In the Backoffice, go to the Modules section and click “Module Manager”. On this page, in the top-right corner, you will find the “Upload a module” button — click it to proceed.
-
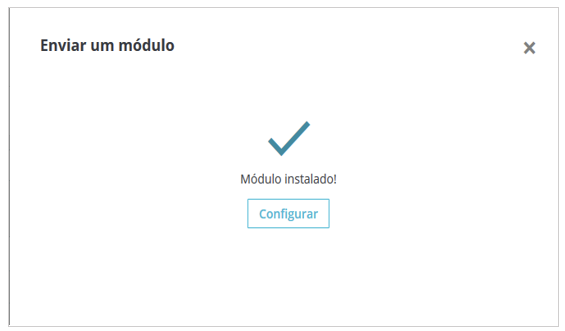
Drag the file you downloaded initially, “prestashop_easypay_v1.2.9.zip”, and wait for the software installation to complete. Once it is finished, you will see the message shown in the following image:
Configuration
-
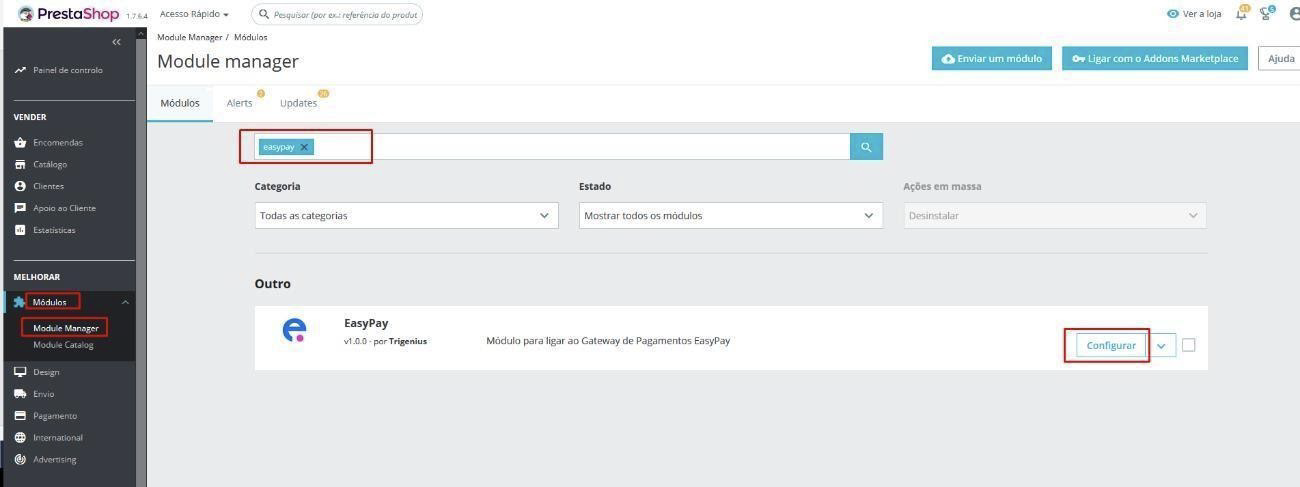
Access the PrestaShop back office, go to the Modules section, and click Module Manager. In the search bar, type “easypay” and press Enter on your keyboard.
-
An easypay module result will appear. Click “Configure”, as shown in the image.
- You will find several fields available for configuration:
- Enable test environment: allows you to test the module before going live in production. Select the option you want.
- Automatic authorization and capture: if enabled, EASYPAY automatically captures payments. Otherwise, payments must be manually captured in the Back Office (see manual capture section later in this guide).
- Number of days each payment method is stored - frequent payments - if the user chooses to save payment details, they will be stored for the number of days defined in this field (enter an integer).
- API ID: enter your easypay API ID. You can find it in the easypay Backoffice under:
“Developers” → “API Configuration 2.0” → click “Keys”. - API KEY: enter your easypay API KEY. You can find it in the same location:
“Developers” → “API Configuration 2.0” → click “Keys”. - Enable VISA: enable or disable Visa payments.
- Minimum amount for recurring Visa/Mastercard payments: sets the minimum order value required to allow recurring payments with Visa.
- Maximum amount for recurring Visa/Mastercard payments: sets the maximum order value allowed for recurring payments.
- Enable Multibanco: enable or disable Multibanco payments.
- Multibanco reference expiry date: defines the number of days a Multibanco reference remains valid (maximum 180 days). Enter 0 if you do not want an expiry date.
- Minimum amount for recurring Multibanco payments: sets the minimum order value for recurring Multibanco payments.
- Maximum amount for recurring Multibanco payments: sets the maximum order value for recurring Multibanco payments.
- Enable MBWAY: enable or disable MBWay payments.
- Minimum amount for recurring MB WAY payments: sets the minimum order value for recurring MBWay payments.
- Maximum amount for recurring MB WAY payments: sets the maximum order value for recurring MBWay payments.
- Enable Direct Debit: enable or disable Direct Debit payments.
- Minimum amount for recurring Direct Debit payments: sets the minimum order value for recurring Direct Debit payments.
- Maximum amount for recurring Direct Debit payments: sets the maximum order value for recurring Direct Debit payments.
- GENERIC LINK: copy this URL and go to the easypay Backoffice: “Developers” → “API Configuration 2.0” → click “Notifications”, then paste the URL in the “Generic – URL” field.
- VISA DETAIL: copy this URL and go to the easypay Backoffice: “Developers” → “API Configuration 2.0” → click “Notifications”, then paste it in the “Card Details URL (Visa Details)” field.
- VISA FRONT: copy this URL and go to the easypay Backoffice: “Developers” → “API Configuration 2.0” → click “Notifications”, then paste it in the “Card Redirect (Visa Details) – URL” field.
Manual payment capture
-
To capture payments manually: configure the module as described above and disable “Automatic authorization and capture”.
-
Wait for a new order and for the customer to select the payment method in the easypay gateway (including Visa payments).
-
Then go to the PrestaShop Back Office under: More → “Authorize Payments – EASYPAY”
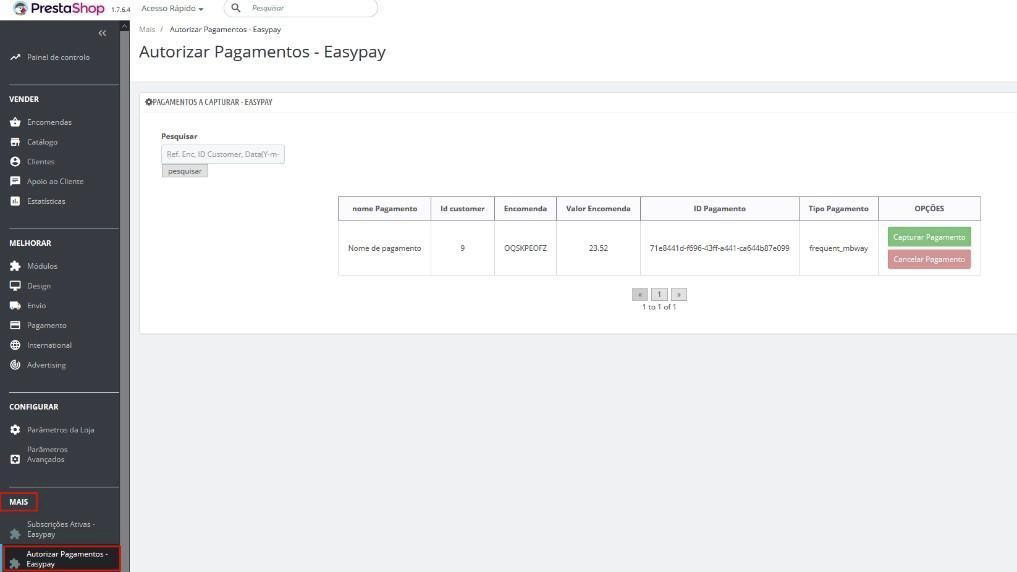
-
Check if there are any pending payments and click the button that matches how you want to proceed: “Capture Payment” or “Cancel Payment”.
Create subscription products
-
To use the subscription payment method, you must configure the module and enable the “Direct Debit” payment method.
-
You must then create a new product/service configured as a subscription product:
-
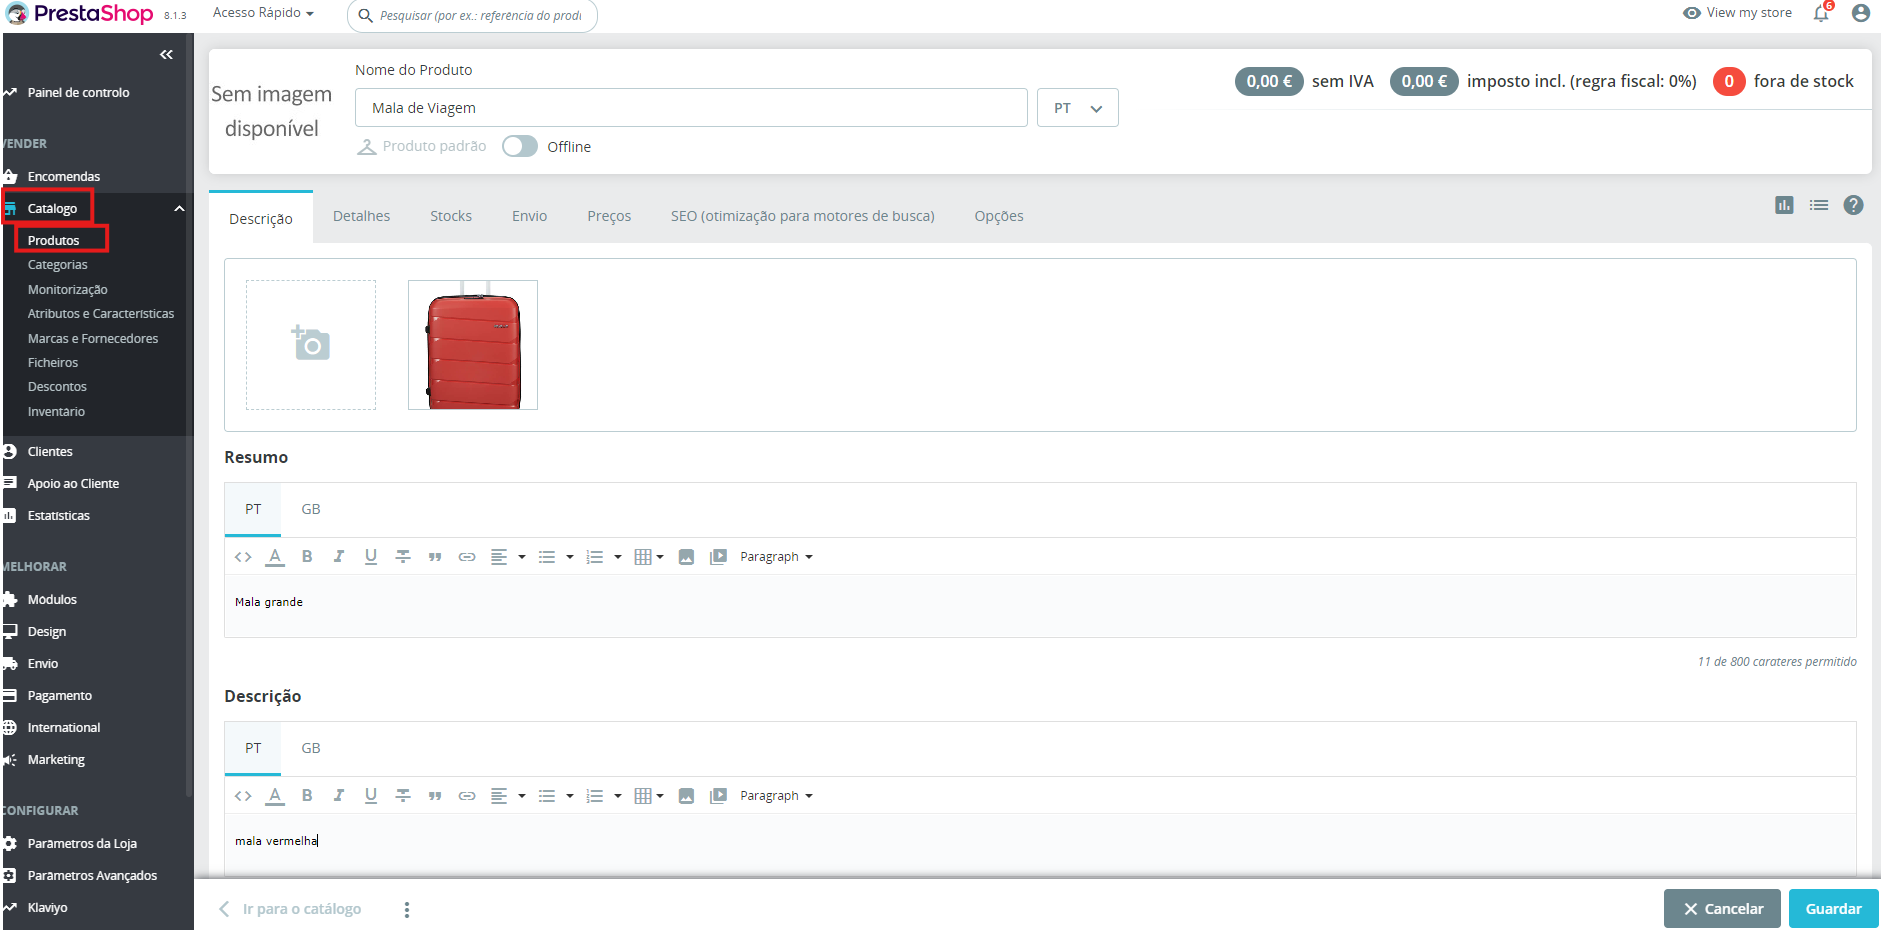
Go to the PrestaShop Back Office: “Catalog” → “Products”, then click “New Product”.
- Fill in the default PrestaShop product settings to create a product:
-
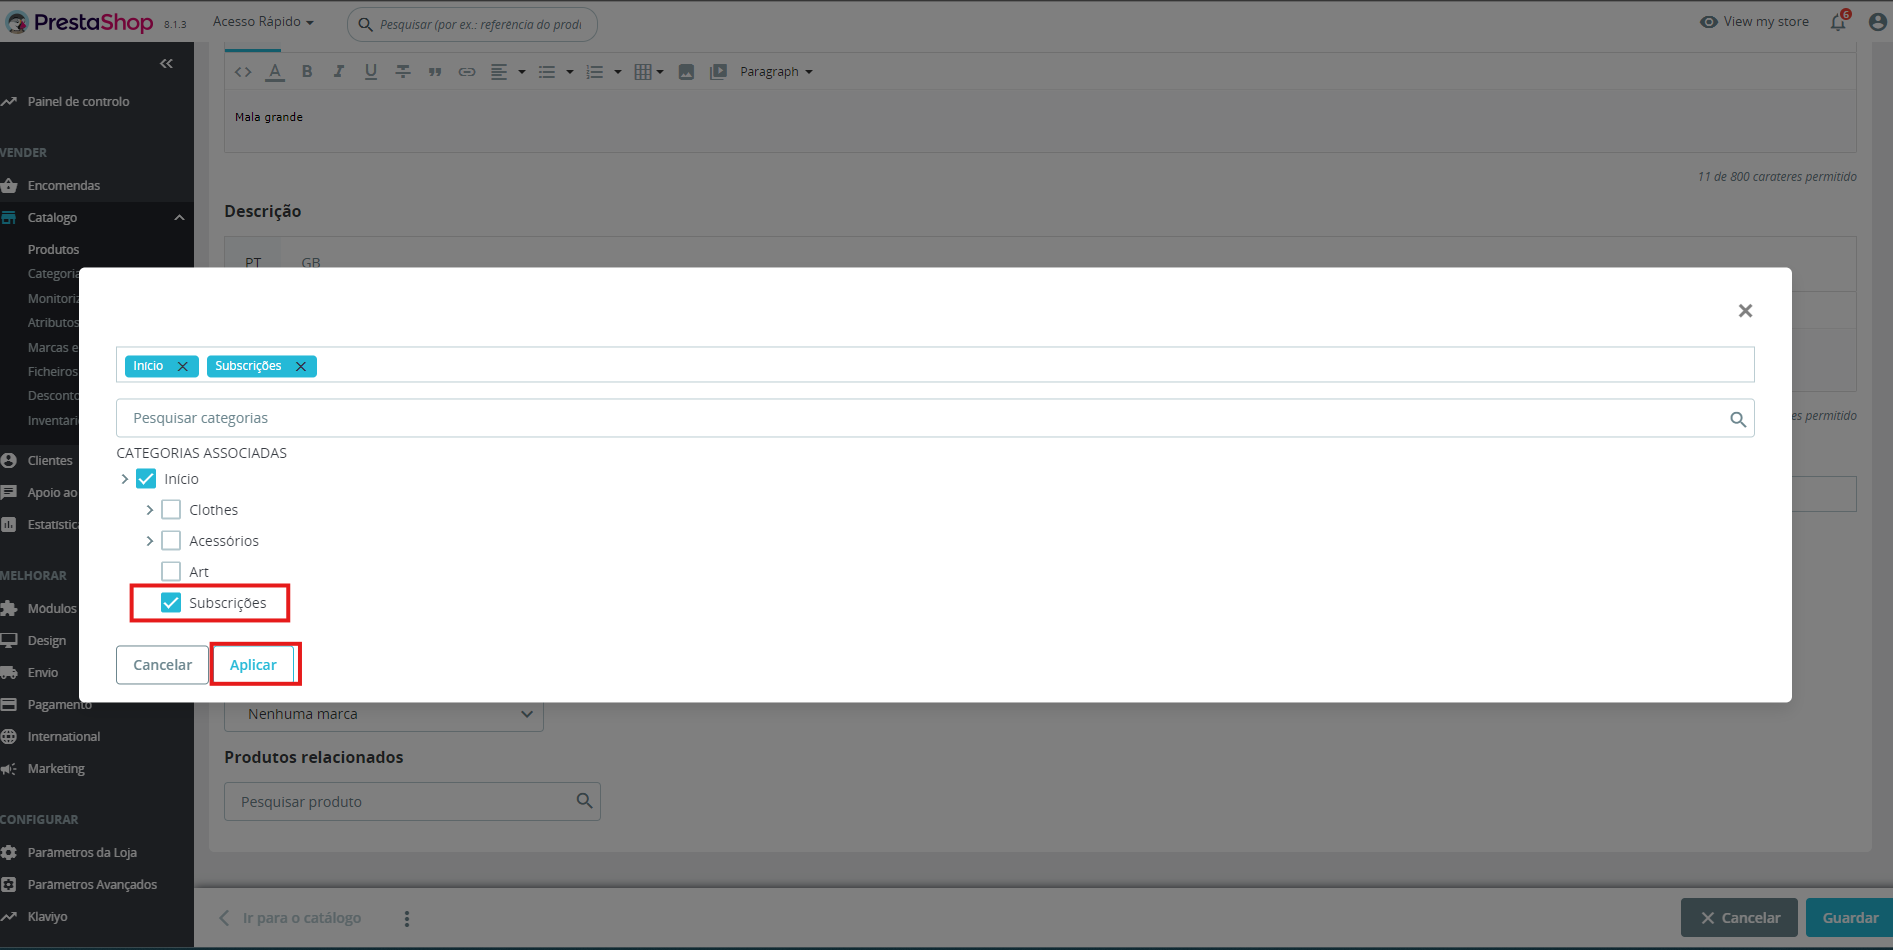
At the bottom of the page, select the categories that will define where the product will be displayed, and add a new category “Subscriptions” (this is mandatory and will be automatically created in advance by the EASYPAY module during installation).

-
The “Default category” must be set to “Subscriptions”.

-
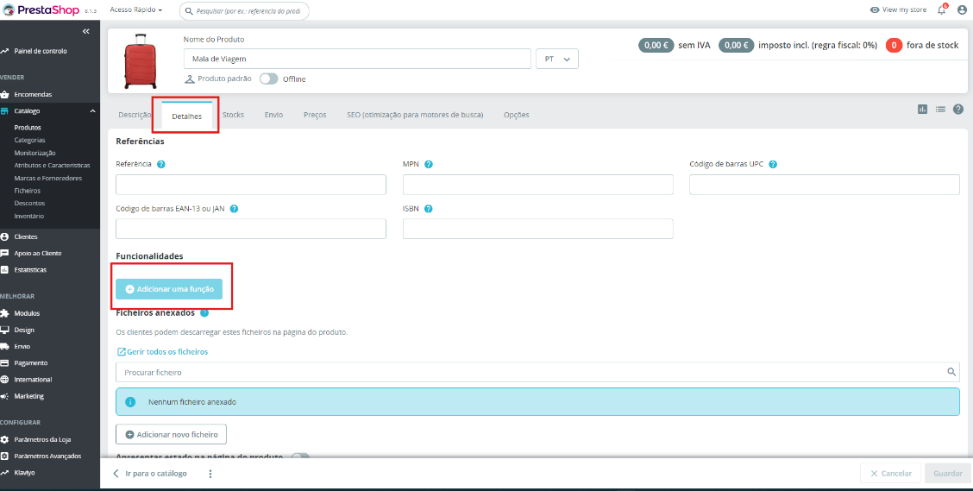
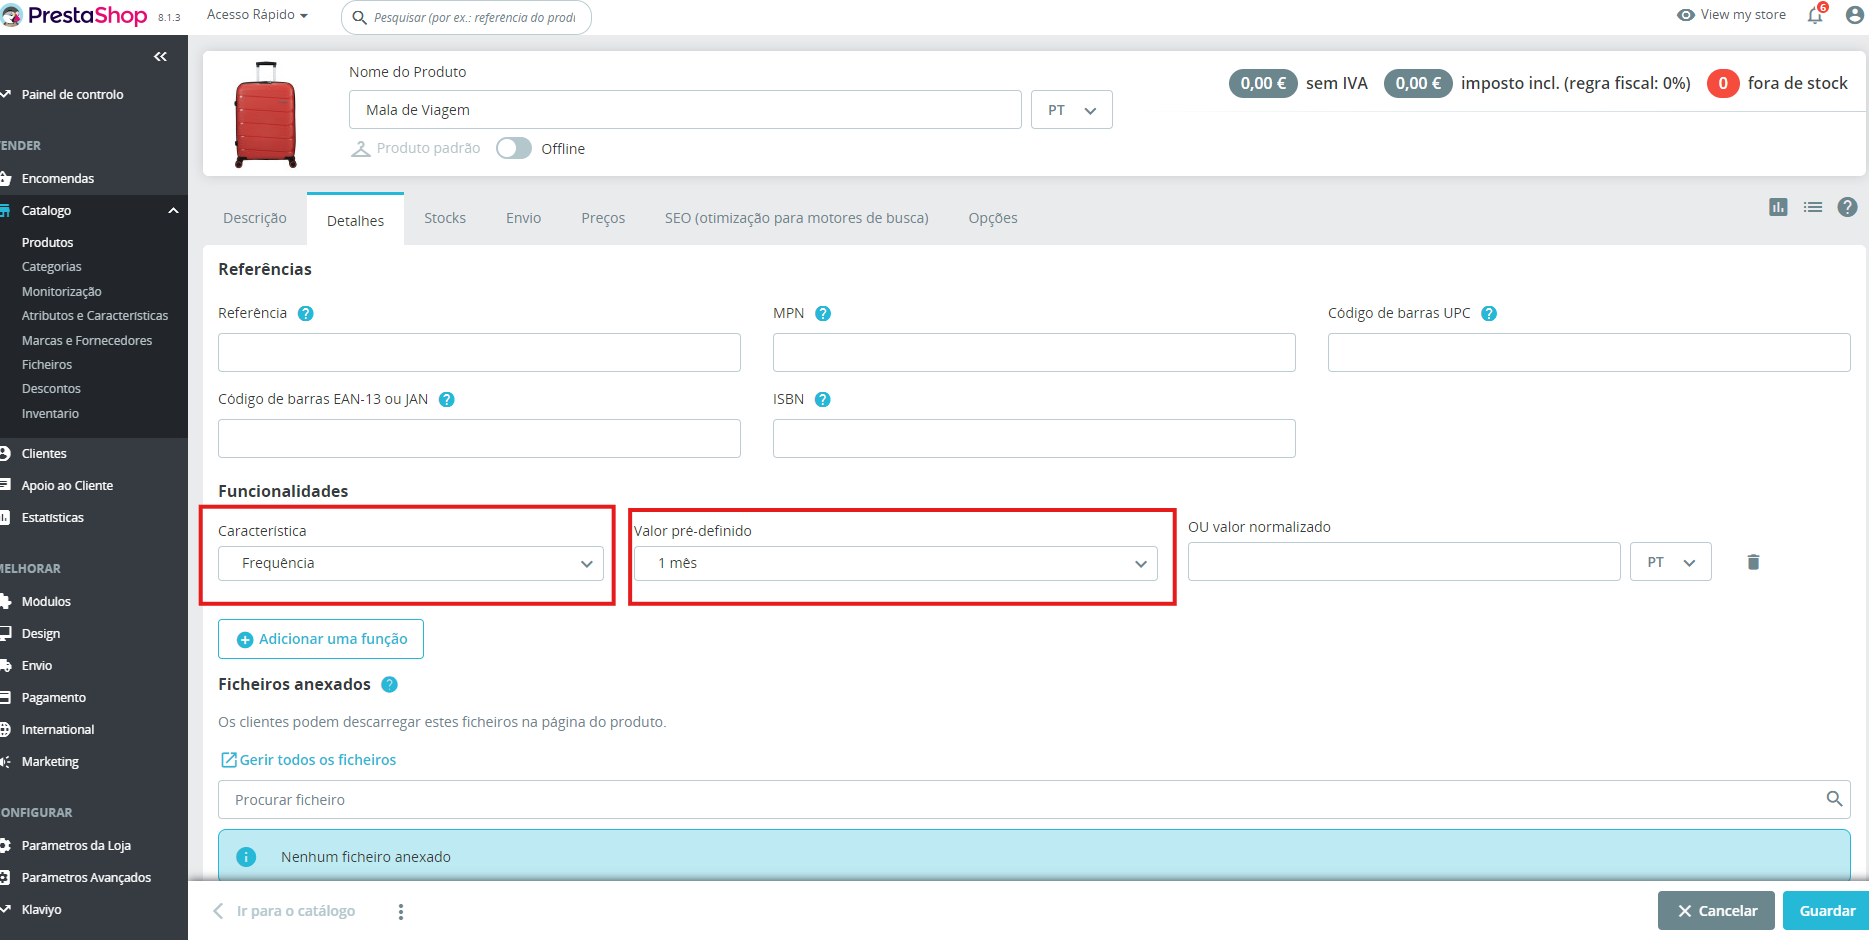
In the product features section, in the first field called “Feature”, add “Frequency”, and in the “Predefined value” field select how often the customer will be charged. A practical example: if you select “1M” and the subscription value is €12.30, then every month the customer will be automatically charged €12.30, until the subscription is cancelled or the subscription period ends.
-
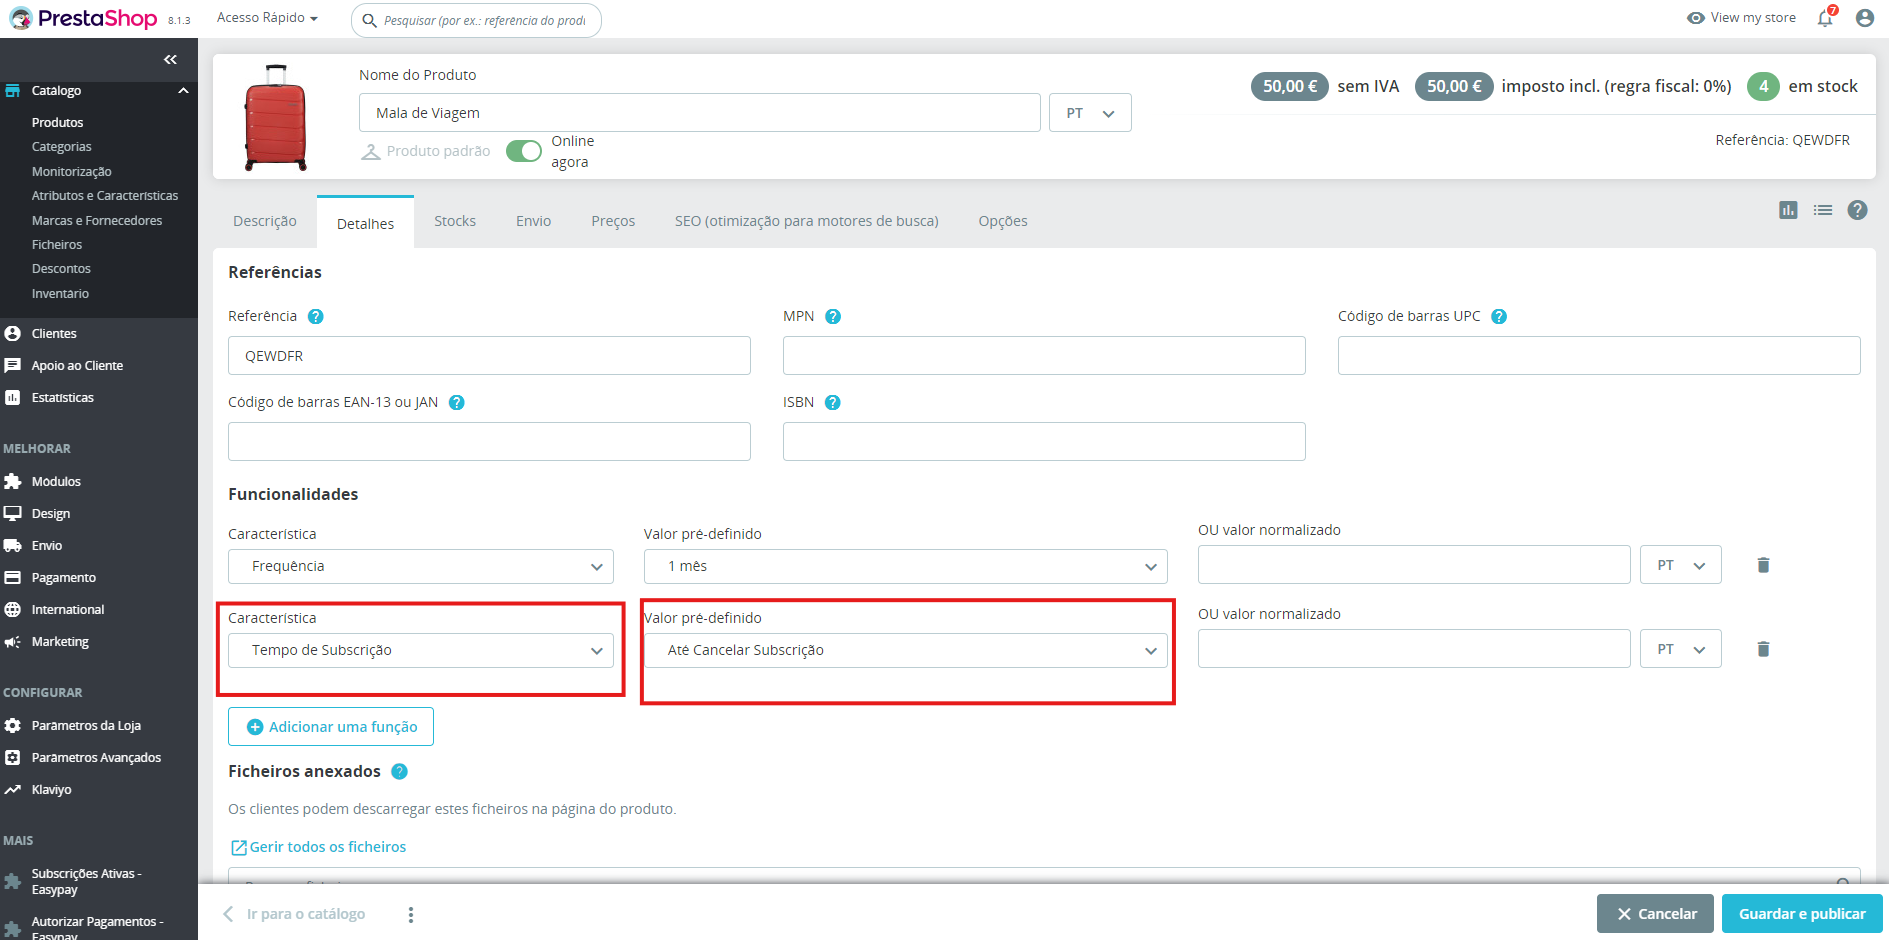
In the product features, add a new one and select “Subscription duration”. This option defines the maximum duration of the subscription, making it expire after the specified period. If you select “Until subscription is cancelled”, the module will continue renewing the subscription at the previously defined frequency until either the customer or the merchant manually cancels the subscription.
-
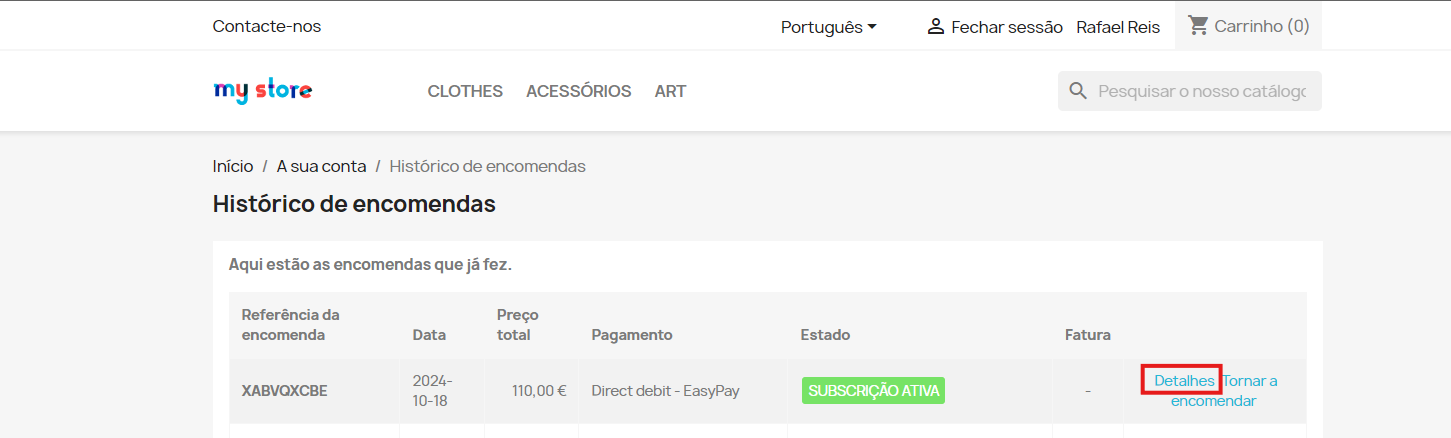
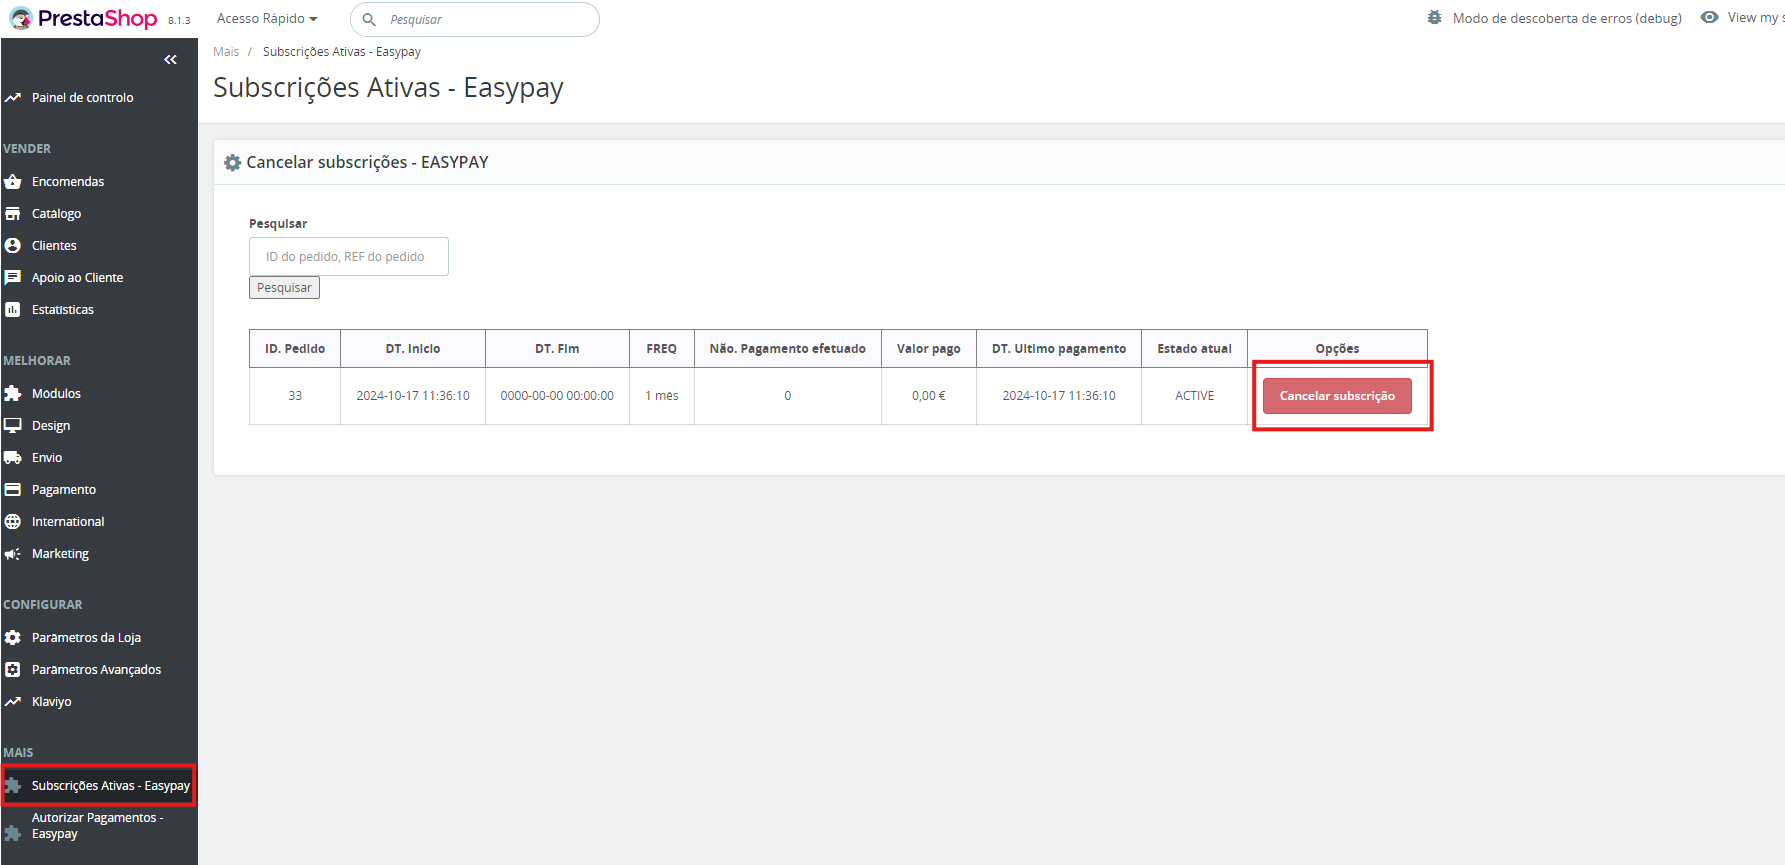
- To cancel any active subscription (MERCHANT), go to the PrestaShop Back Office: “MORE” → “Active Subscriptions – EASYPAY”, where you will find the subscription(s) you want to cancel. Then click the “Cancel Subscription” button
-
To cancel an active subscription (CUSTOMER), go to “Orders” (the location in the Front Office may vary depending on the template used), access the subscription payment method, and click “Details”. Once all details are displayed, you will find a “Cancel Subscription” button between the addresses and the product list (this information may vary depending on the merchant’s Front Office configuration).